


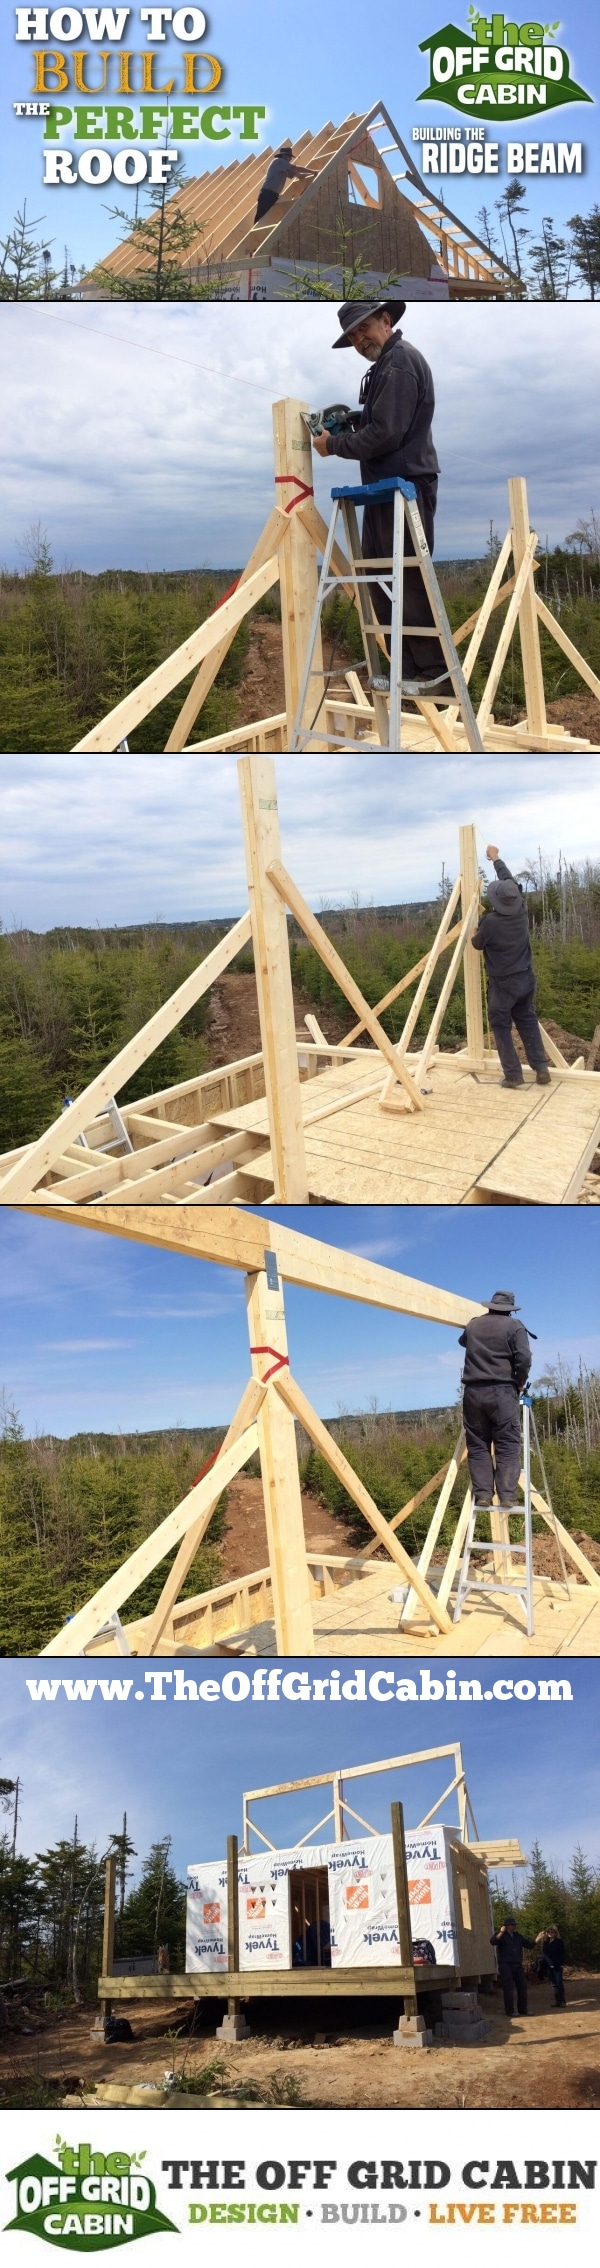
Building The Perfect Cabin Roof Part 1 of 5
Here’s how to build the perfect ridge beam every time!
Simplicity is the ultimate sophistication. ~ Leonardo da Vinci
Whether your building an off grid cabin, tiny house, or a shed in the back yard there’s a 100% chance you’ll be putting a roof on it and its got to last for decades.
Wouldn’t it be nice if the roof was just a simple quick design, build and poof.
Let’s face it, not everyone enjoys being one or two storeys off the ground, holding a heavy wooden beam and swinging a hammer
I know I don’t!
So.. I’m here to make it really, REALLY easy for you (and for me).
That’s why we started with the ridge beam and we built it in small, easy to handle segments.
Most Roof Designs
Unfortunately, most common rafter and truss designs used today are not easy to build and even more cumbersome to install. They can have complex angles to cut, involving math and measurements that some of us would much rather do without.
They can be heavy to hoist if you’re working solo, or with just one other person, in a remote location. They also have some real drawbacks that can adversely put undo stress on your structure even when built properly.
All that aside, we feel we’ve cracked the code on building rafters and found the perfect design that exceeds the classic rafter design and will provide a long lasting, sturdy and secure structure for your roof. If you haven’t yet gone through our Ultimate Roof & Rafter Guide have a breeze through it to become familiar with roofing terminology and designs.
Our Rafter Design
Right off the bat you might not spot the difference between our rafter (below)…
… and that of the common rafter (below), but you soon will.
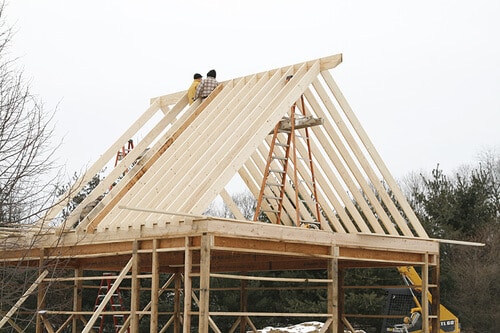
We personally haven’t seen the rafter design we use on any other cabins. However, that’s something we hope to remedy after we’ve explained all of the benefits of its design.
The Typical Common Rafter
In typical frame construction a birdsmouth joint (or bird’s beak cut) is a wood-working joint generally used to connect a rafter to the top plate of its supporting wall. This cut is used at the bottom while the top of the rafter is butted up again the side of the ridge beam/board.
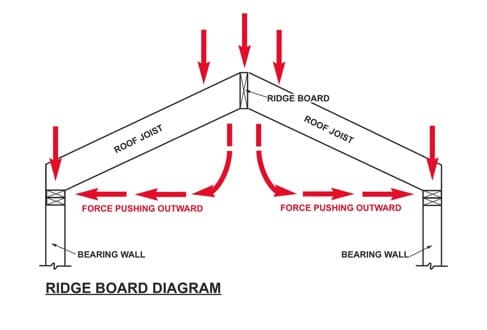
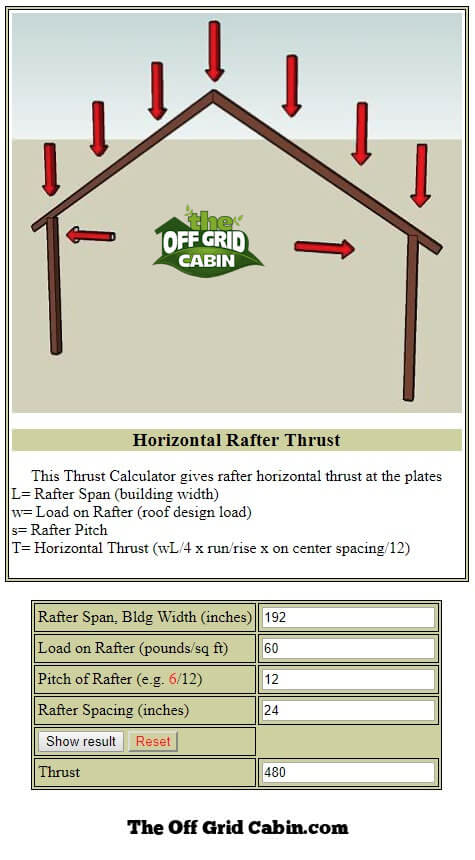
Rafter Thrust
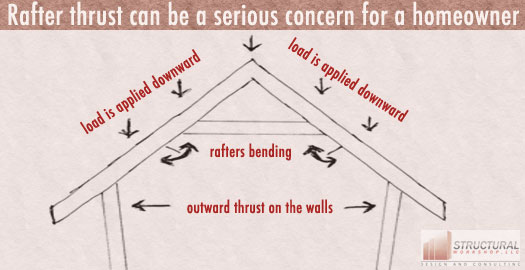
Photo from www.timbertoolbox.com
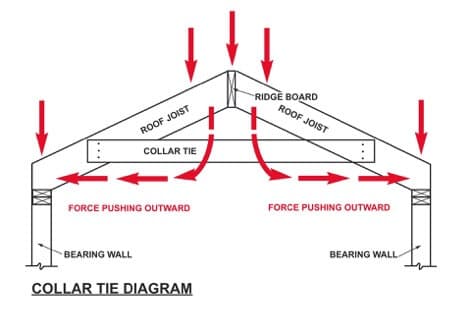
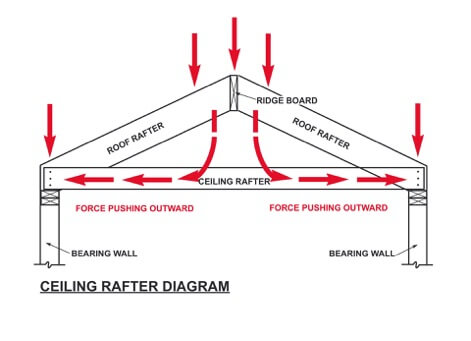
In typical rafter construction, outward “rafter thrust” is compensated for by using rafter ties and collar ties but is not eliminated.
TimberToolbox has a great calculator for rafter thrust and you can check it out here.
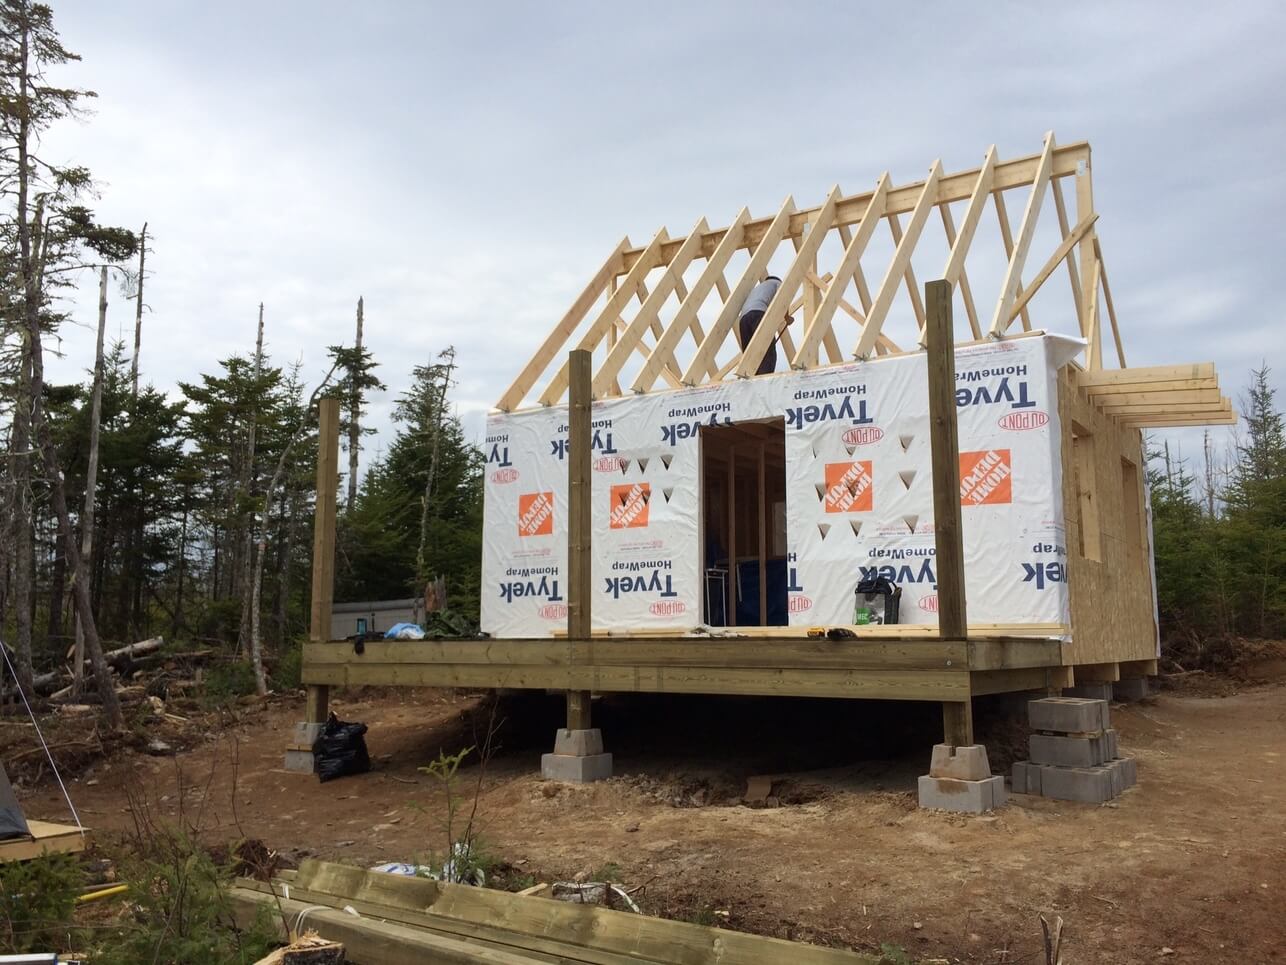
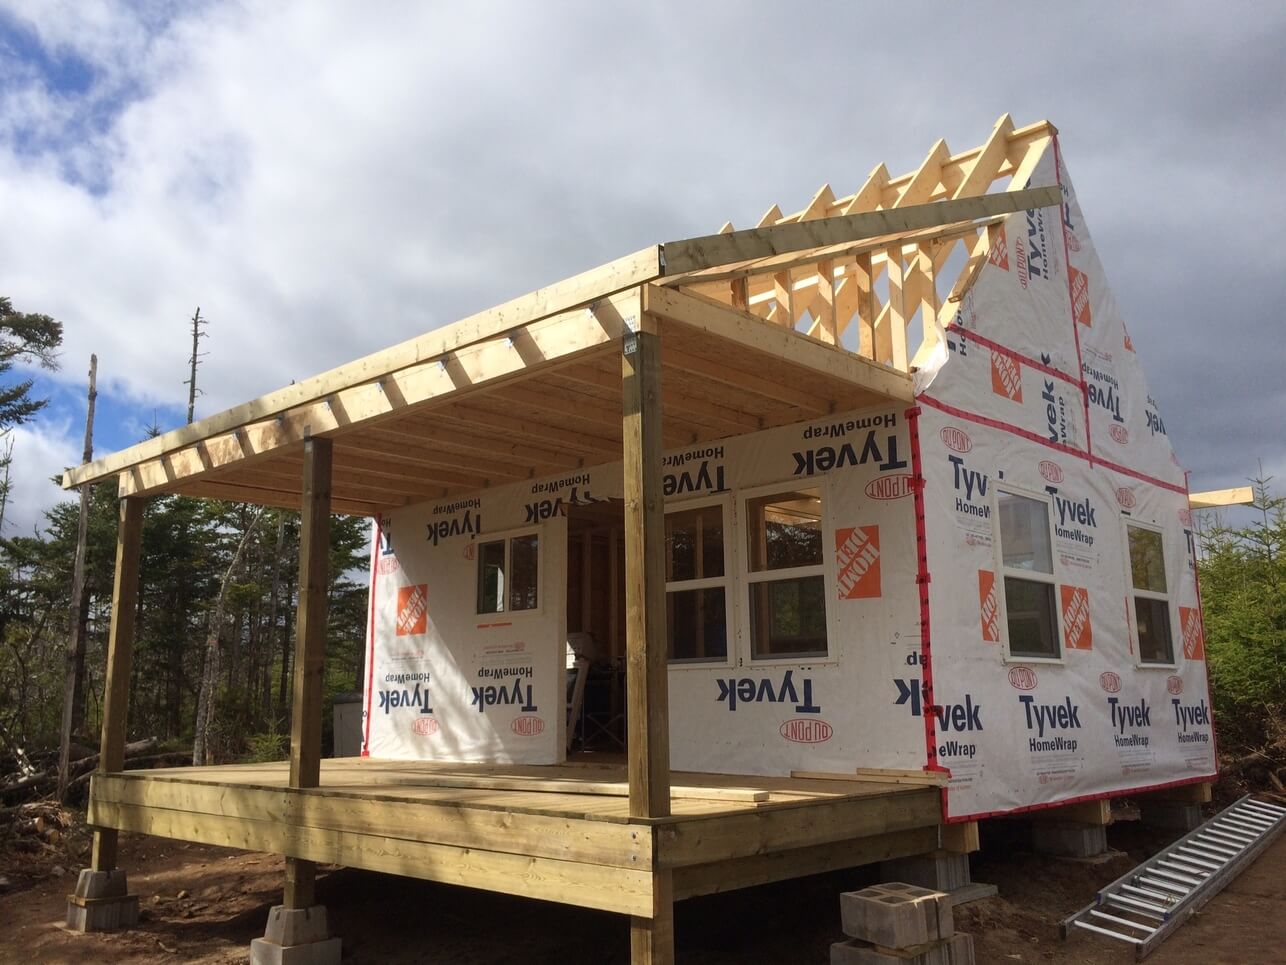
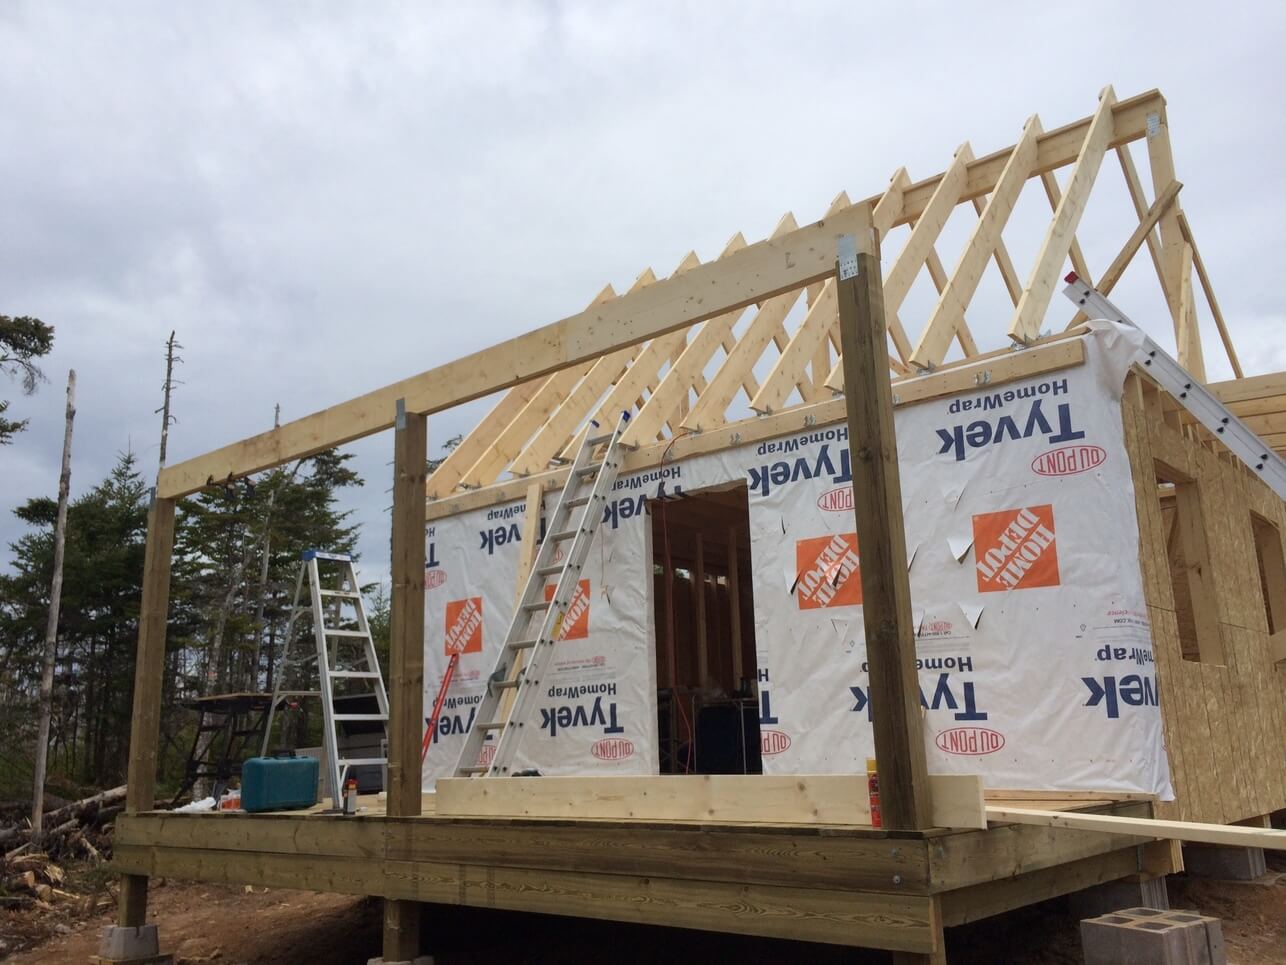
Our cabin roof has three sloped surfaces (seen below) which I’ll be referring to in this and future posts.
- The main rafters on the rear of the cabin.
- The main rafters on the front of the cabin
- The front deck rafters.
Our Rafter Design
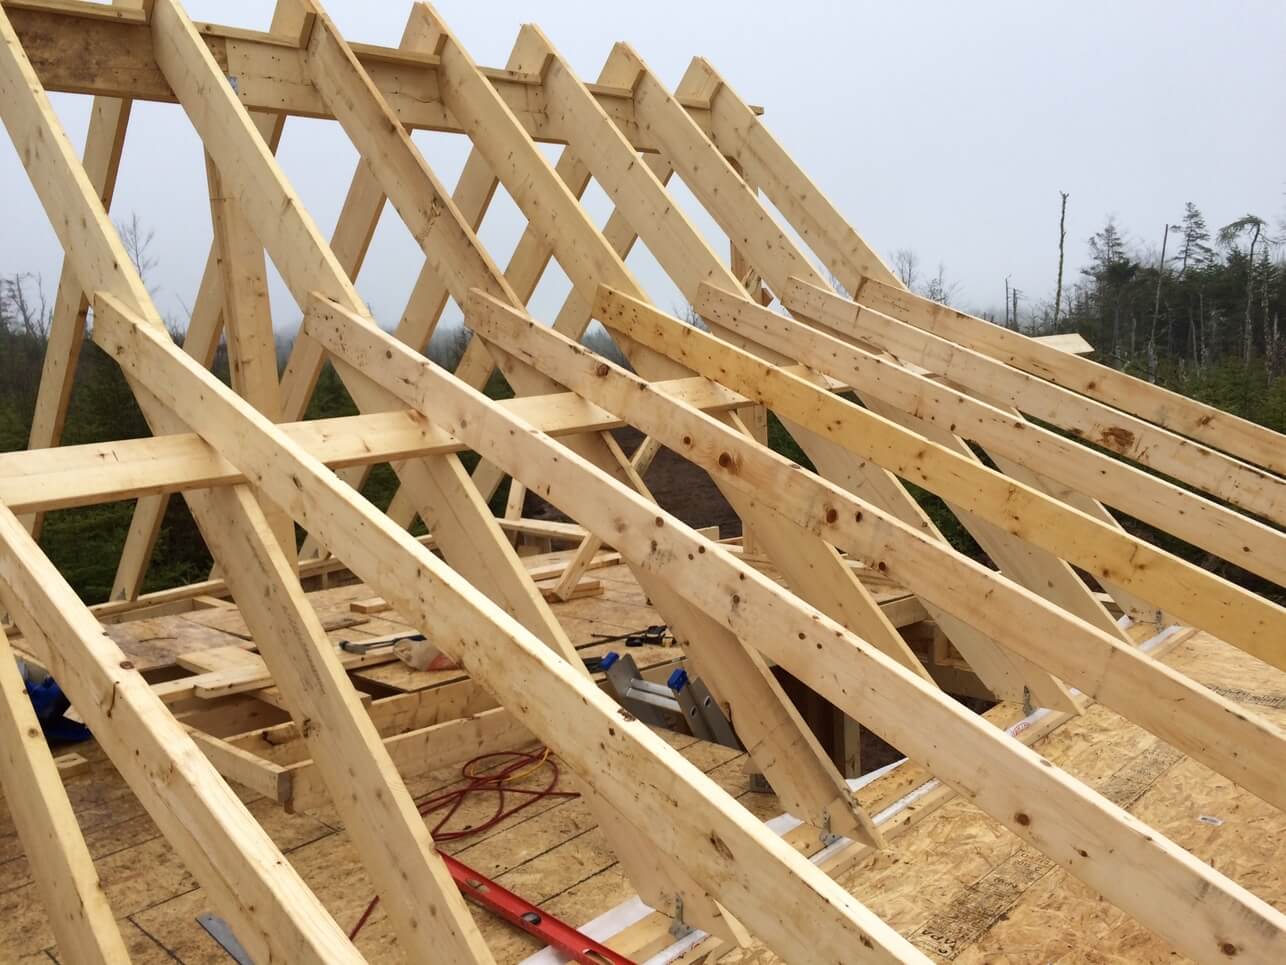
In our rear rafter design, the birdsmouth cut is at both the top and bottom so that the entire weight is carried by the supporting wall as well as the ridge beam (see below).

The front main rafter also has a birdsmouth cut at the top only. The bottom of the rafter sits directly on top of the wall top plate (see below). There is no birdsmouth made here as there is no overhang required. the bottoms of thee rafter will be hidden inside the front deck roof.
Lastly, the deck rafters have a birdsmouth at the bottom only which sits on top of a ridge beam (see below).
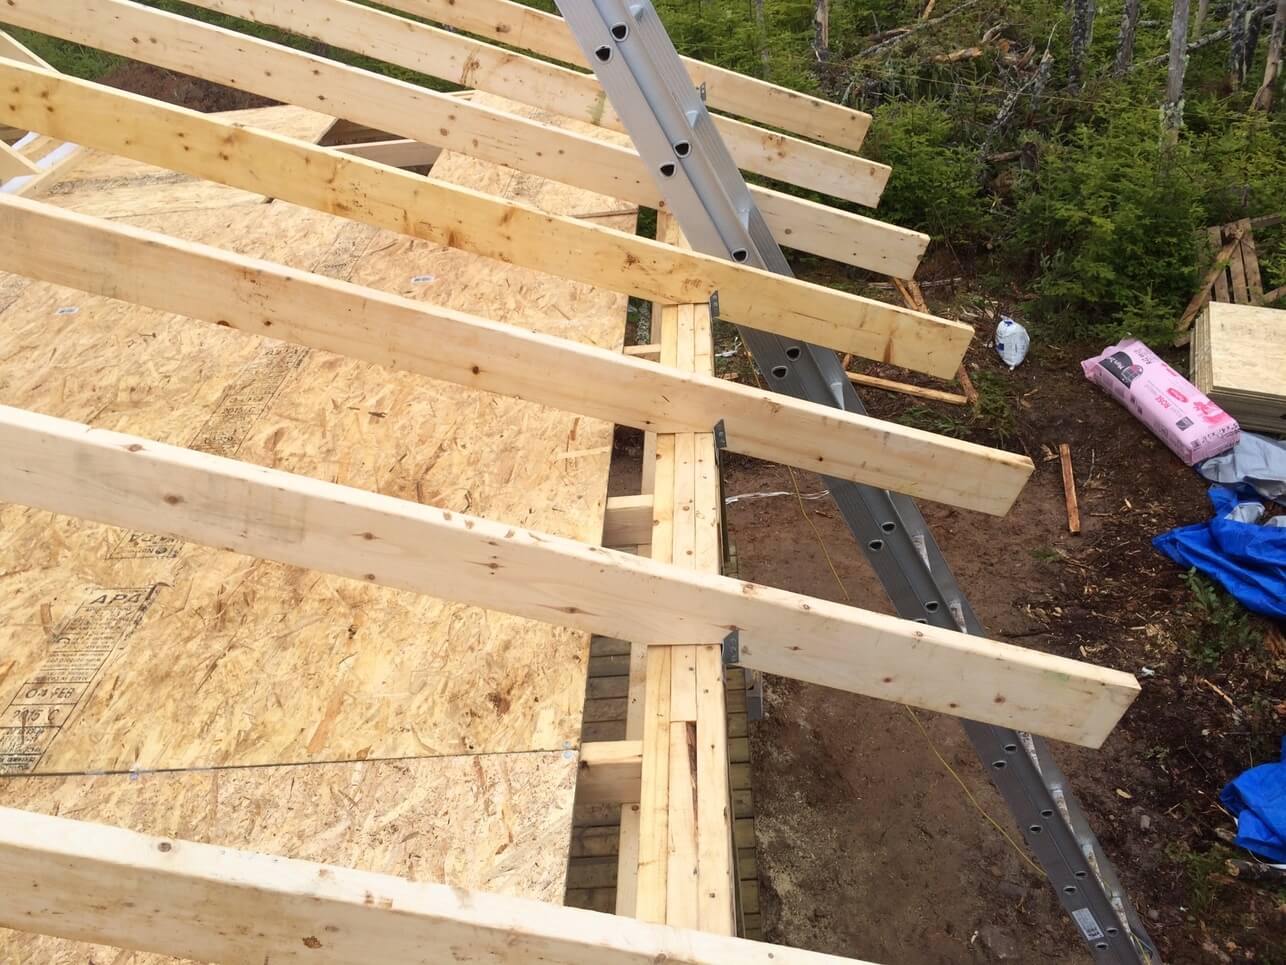
The top of these sit on top of a purlin and are nailed into the main rafters (see below).
The Benefits
Less Time: This rafter design is simple. It takes less time to measure, cut and install. Especially if working alone or with one person on the ground doing the cutting and the other up top installing them.
Less Money: On a simple gable roof like ours, the 2x10s (along with the ridge beam) are less expensive than ordering or building trusses. The cost of a crane (used to hoist up pre-build trusses) can range from $100/hr to $350/hr depending on the lifting capabilities required. Also, there was no way we were getting a crane to our remote build site.
Less Work: Lifting a full length 20 foot 2×8 (54lbs) or 2×10 (66lbs) is much easier than trying to lift and maneuver a 75lb-85lb truss into place. You can check out www.engineeringtoolbox.com for a chart showing the different weights of typical lumber.
Increased Safety: I’ve seen people try and build all sorts of rigs and slides with ropes, pulleys and ratchets to raise a truss into place. A remote cabin location is no place for injuries! Lifting one half of the rafter at a time is so much safer than lifting anything pre-built.
Zero rafter thrust: Our design removes the horizontal “outward” thrust that is generated in traditional rafter/truss designs and instead creates a strictly vertical load which translates down through the ridge beam, through the walls/vertical support posts and into the ground.
Roof Loads
The roof is always under static (non-changing) and dynamic (changing) loads.
- Dead load: The ridge beam, rafters/trusses, roofing material.
- Live load: Loads imposed by use and occupancy such as snow, wind load, solar panels and even you standing on the roof.
Weather (wind, snow, ice) plays a significant role in the high load experiences by a roof. Here in Canada it’s not impossible to see two feet of snow on a roof. That translates to about 60lbs/sqft.
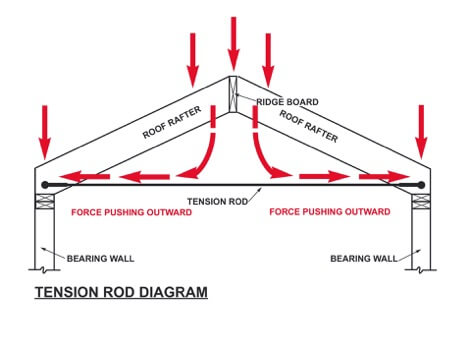
You can visit www.TimberToolBox.com and find several construction calculators including a horizontal rafter thrust calculator. This shows the outward stress experienced by the rafter collar tie/ceiling rafter/tension rod.
In the photo below I’ve used their rafter thrust calculator to determine the outward thrust.
How To Build The Perfect Rafter
It’s time to build the perfect and you’re probably thinking…
This is going to be a designing, engineering and building nightmare!
Well, it certainly doesn’t have be.
We’re going to show you a quick and easy method of building roof rafters that is in many way superior to the traditional rafter design and yes, that includes pre-fab trusses.
If you haven’t yet read our Ultimate Roof and Rafter Guide you’ll probably want to go back and quickly browse through that now to learn exactly why we choose this particular rafter design.
The Birdsmouth
The birdsmouth is comprised of two cuts.
- Seat cut
- Heel cut
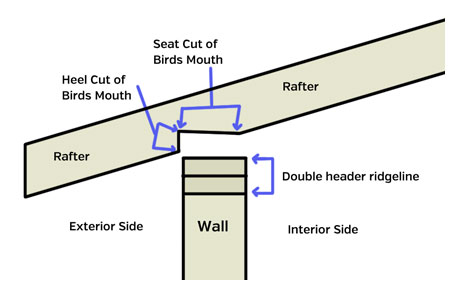
TIP: Never make your heel cut deeper than 1/3 the width of your rafter.
Here’s a great YouTube video by Shannon from www.house-improvements.com showing the same measuring and cutting techniques we use.
REMEMBER: Our rear main rafter design has the birdsmouth cut at the top of each rafter and the bottom. The front main rafter have a birdsmouth at the top and the bottom sits directly on the wall top plate. The bottoms of the main rafters are also attached using galvanized 18-gauge hurricane ties and nails.
MEASURE
1. Determine the pitch of your roof. Ours is a 12/12 pitch meaning it’s a 45 degree pitch roof
2. Calculate the length of the rafter
3. Calculate the length of the overhang (ours has an overhang on one side only)
CUT
1. Cut the fascia end of your rafter (optional). We installed all our rafters and then made a chalk line across the top of all the rafters at the same time and used a level to mark the cut line)
2. Cut the overall length of your rafter (optional). We used the full length lumber over lap at the top and then cut the excess off after wards.
3. Mark the heel cut line(s)
4. Mark the seat cut line(s)
5. Cut the birdsmouth
6. Install the rafter
TIP: One thing Shannon mentions in his video is to measure and cut one rafter and use that as a template to cut the others. While you may get away with that on a small shed we DO NOT recommend doing that on a larger build. There will be plenty of OTHER times during your build when this may again seem like a time saving idea but DON’T! Measure every piece of lumber (twice) individually and cut it once (some minor exceptions are cutting the rafter length as described below).|
There’s nothing worse than taking a short cut which ultimately costs you time and money.

Do it right the first time. ~ Mike Holmes
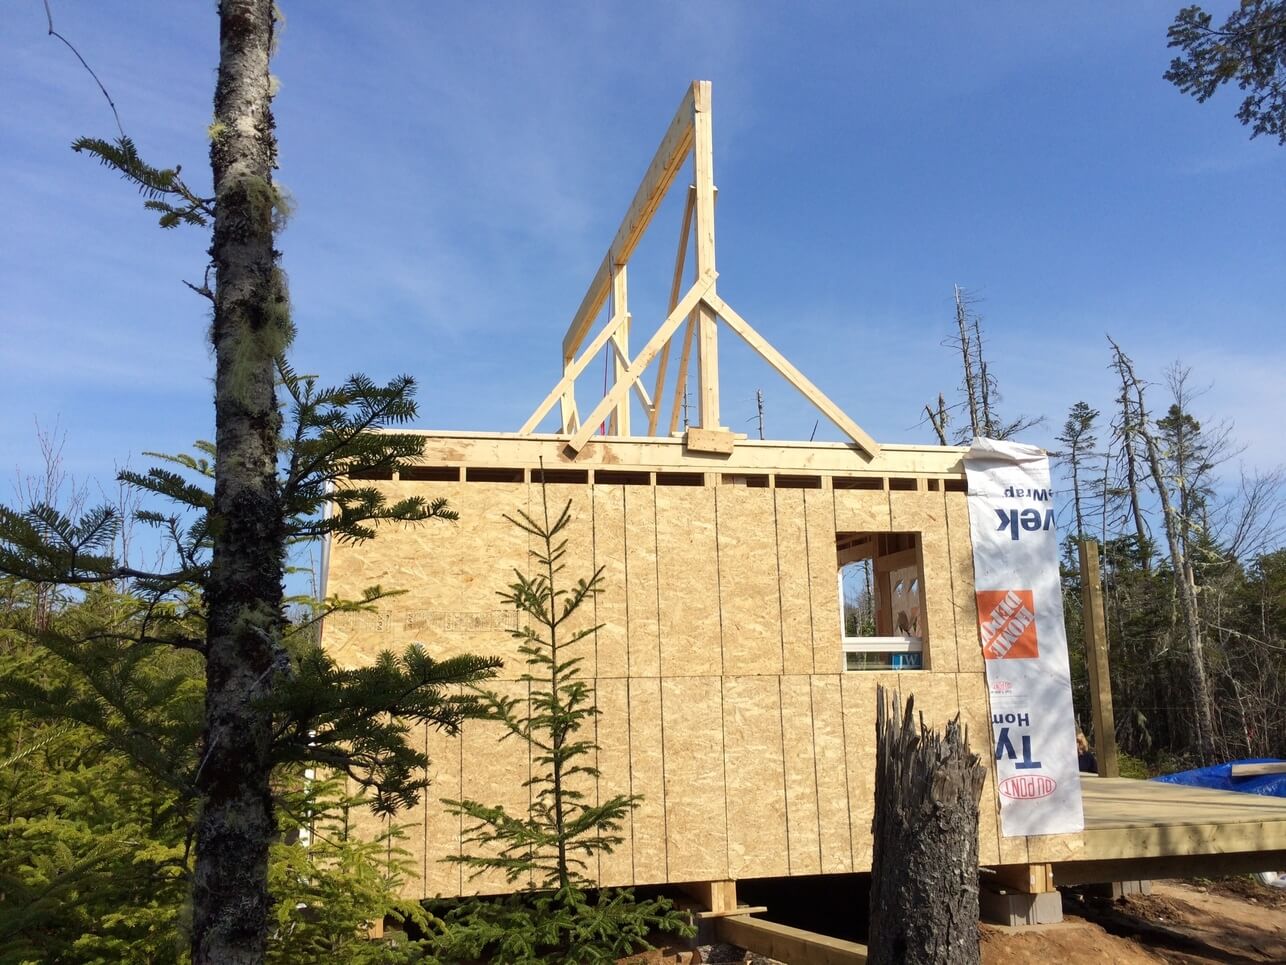
Main Rafter Support Posts
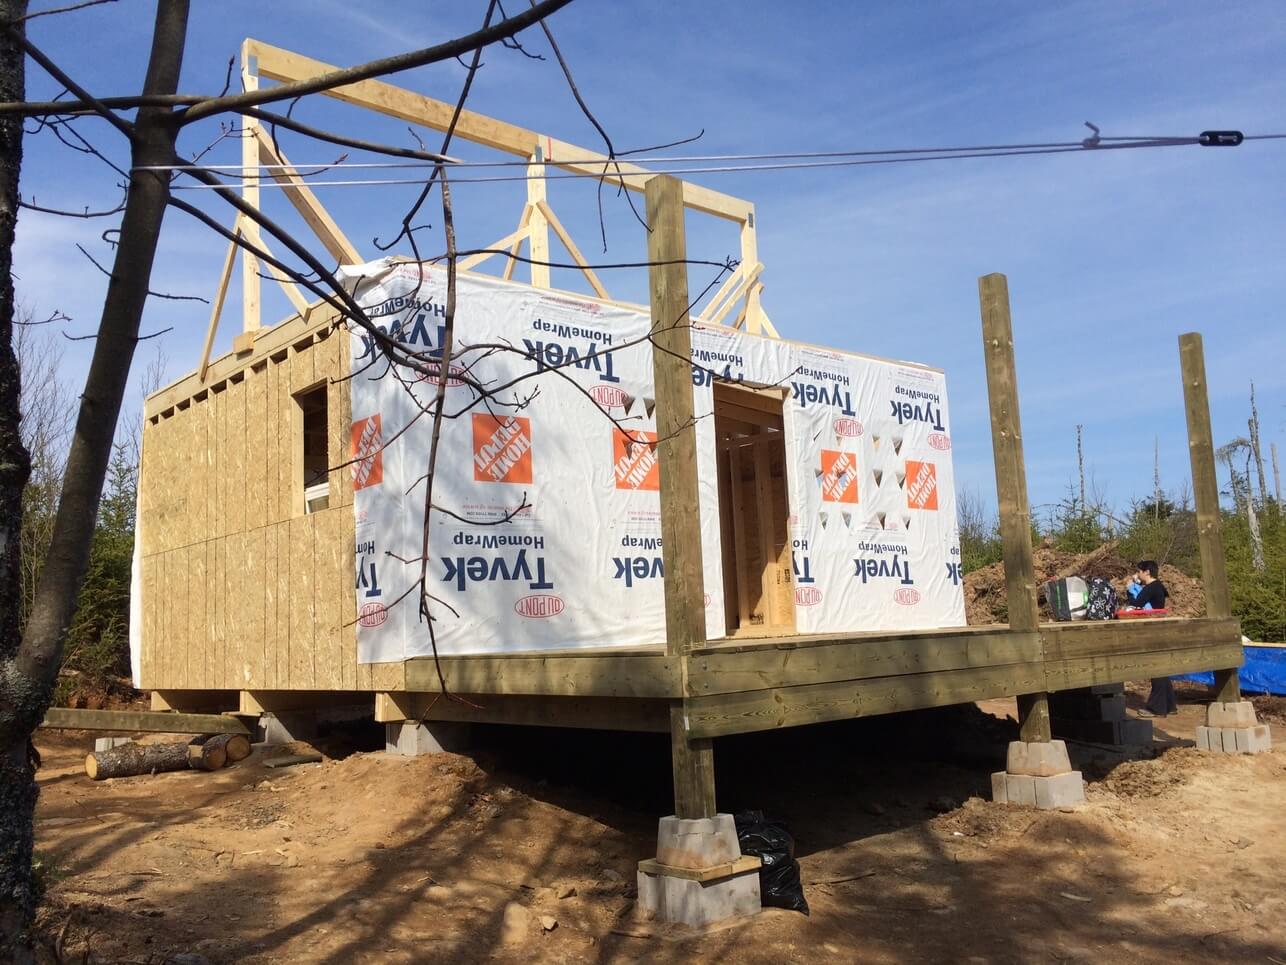
The first thing we need to do is build the three main support posts that will carry the main ridge beam and rafters/roof.
If you recall from Day 3 of Framing The Cabin we tripled up 16 foot 2x6s to form the main center post.
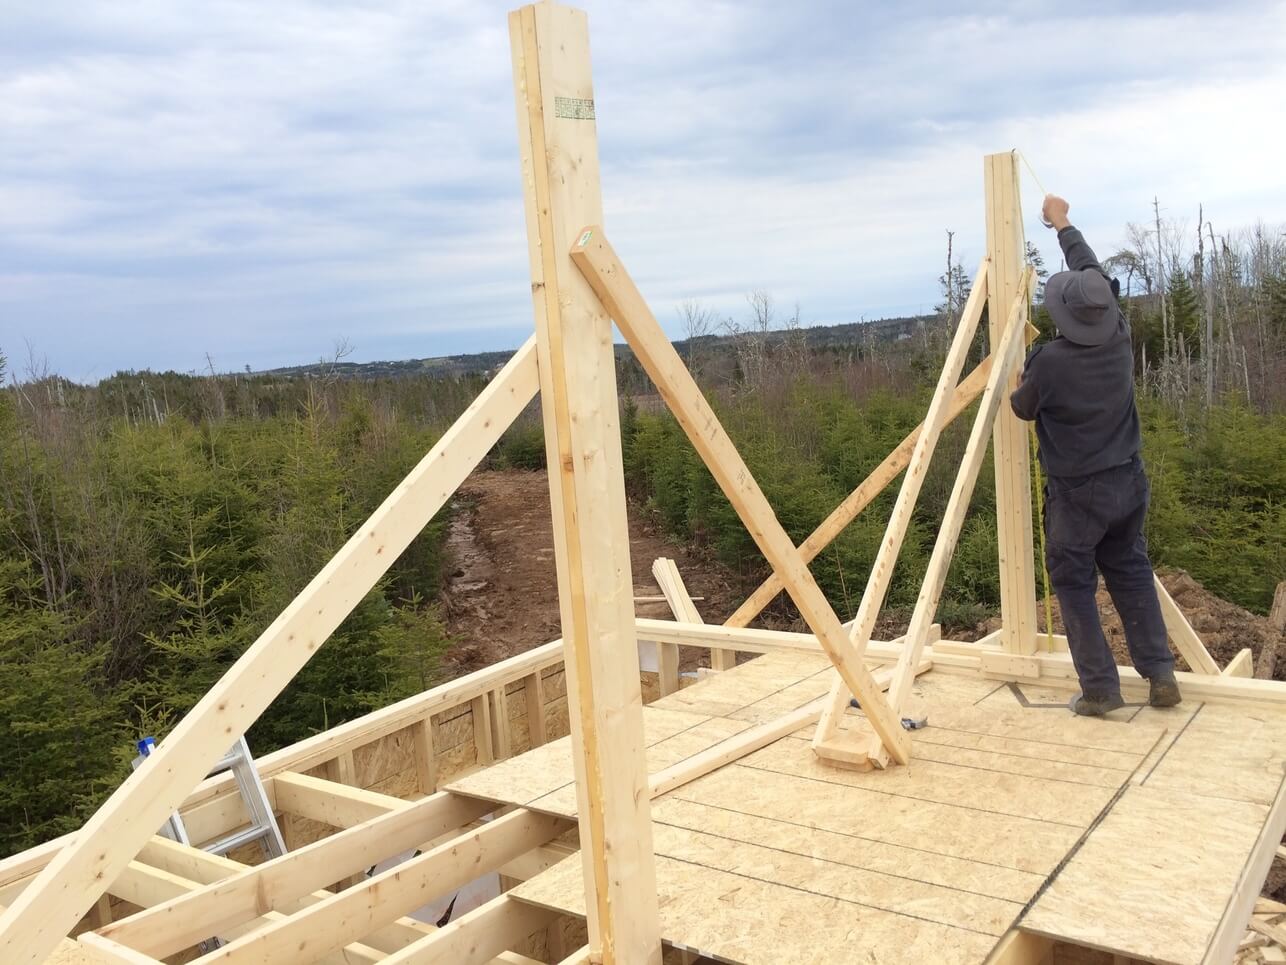
We then tripled up 2x4s to make the post for the loft end of the cabin. We used blocking at the base and 2×4 bracing on three sides to temporarily hold it squarely in place.
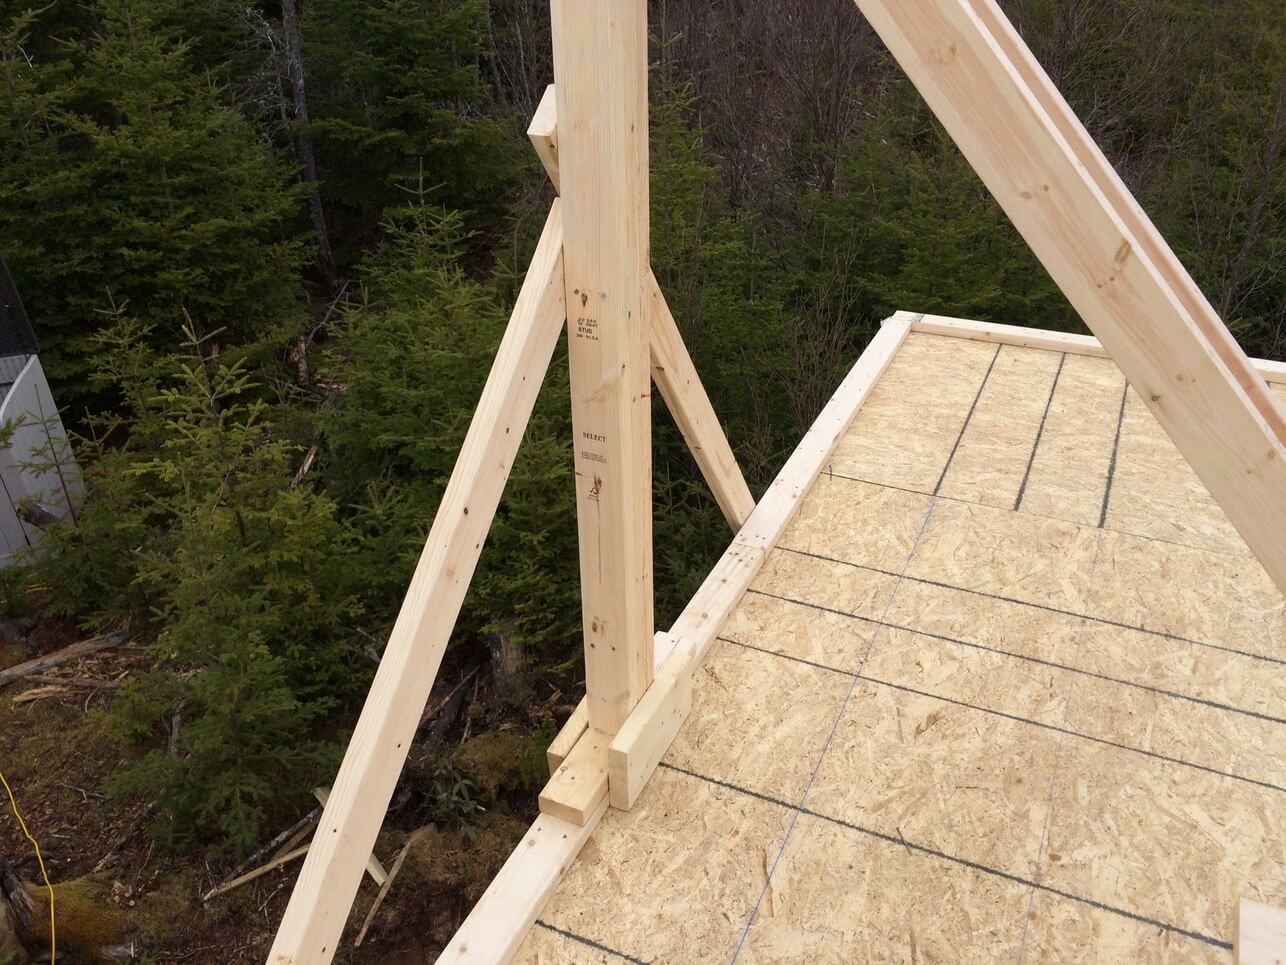
The end post on the other side of the cabin is constructed with tripled up 2x6s. If you recall from Day 3 of Framing The Cabin we used 2x6s to frame the east end wall because that wall will be the end wall for our cathedral ceiling and needs to be beefier to support the load of the ridge beam, rafters, and roof without collar ties or ceiling rafters.
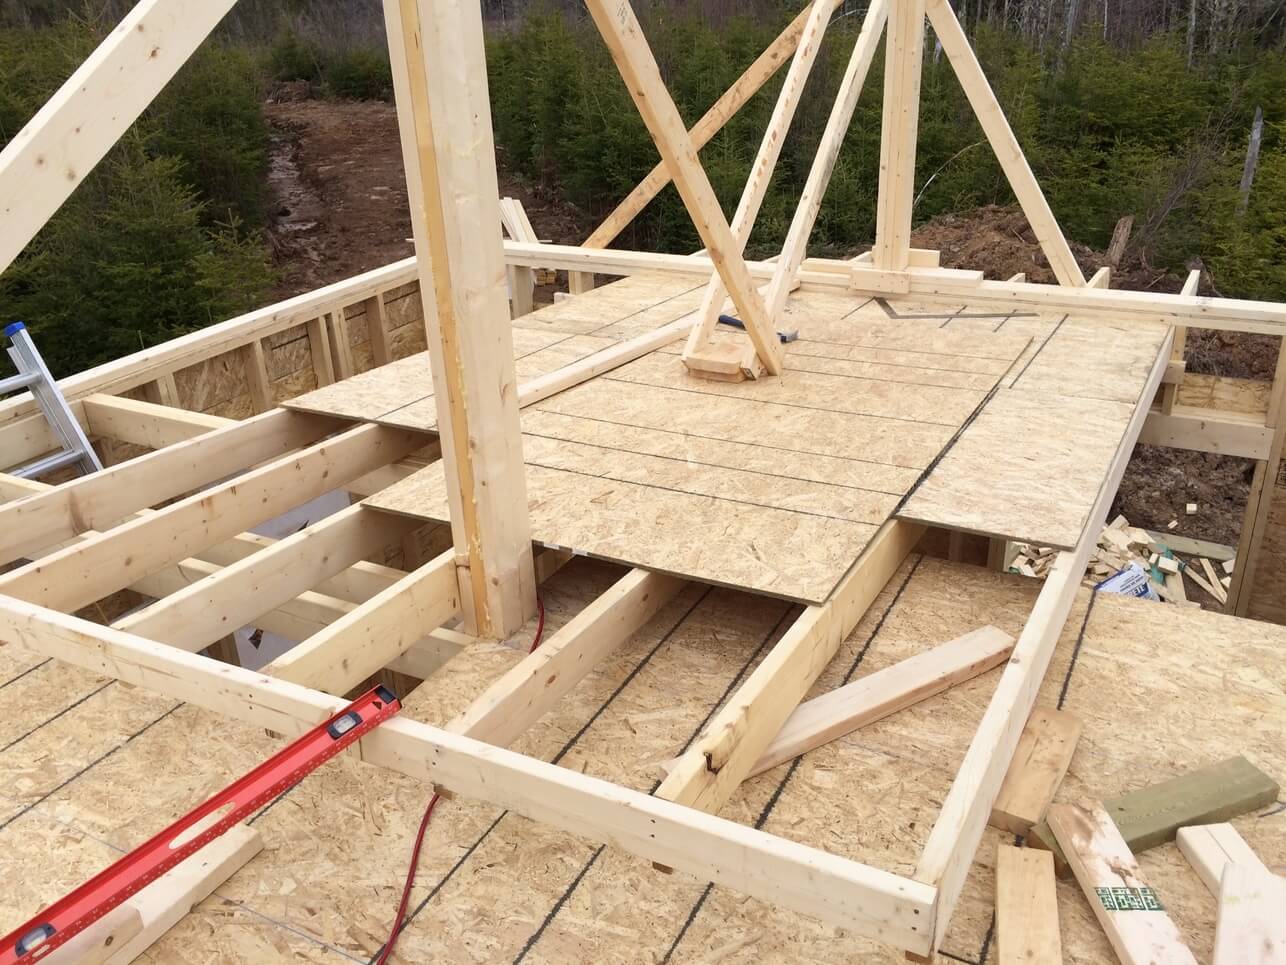
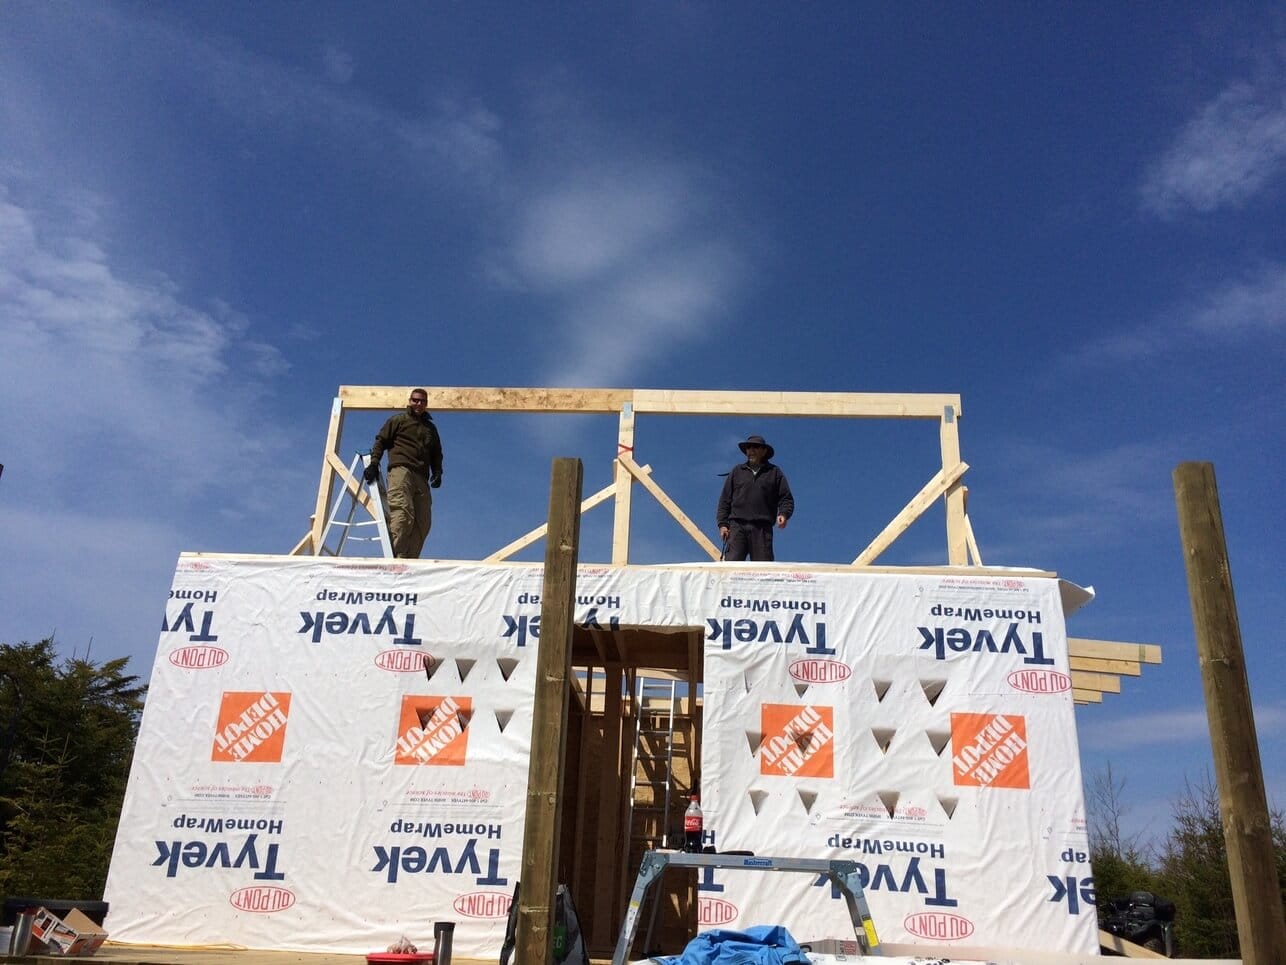
Below you’ll see a temporary work platform we constructed to span the open living room.
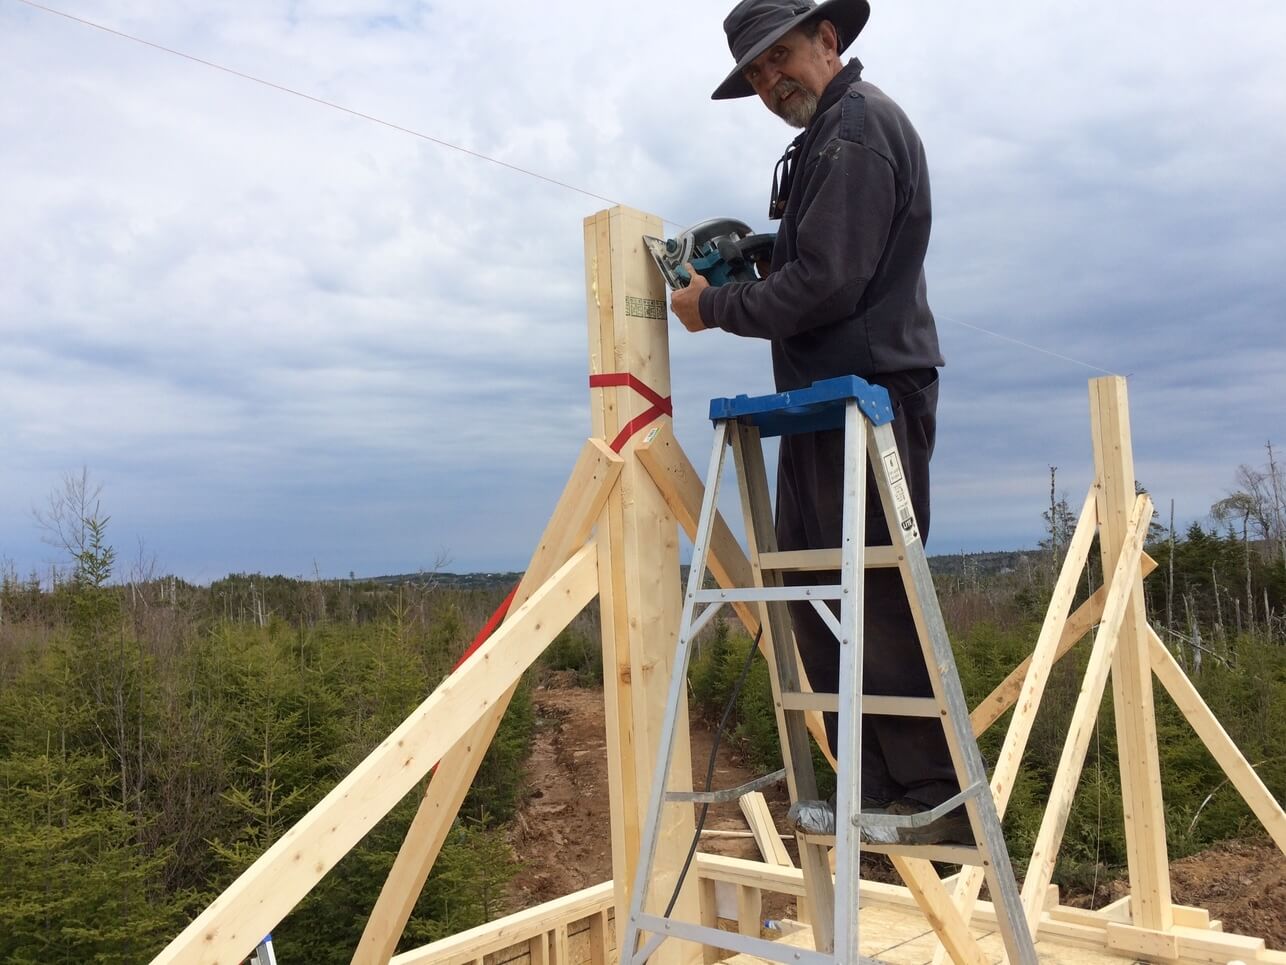
Measuring up the end posts for height, we’ll use a string between them to properly gauge the height of the center post prior to cutting it.
The center post was cut to height using a skill saw on 4 sides and then a hand saw to cut the center bit.
We used a small ratchet to plumb the tippled up 2×6 center post.
HANDY TOOL: Here’s a rock solid set of ratchet straps that survived hauling all our building material by trailer and ATV down to the build site.
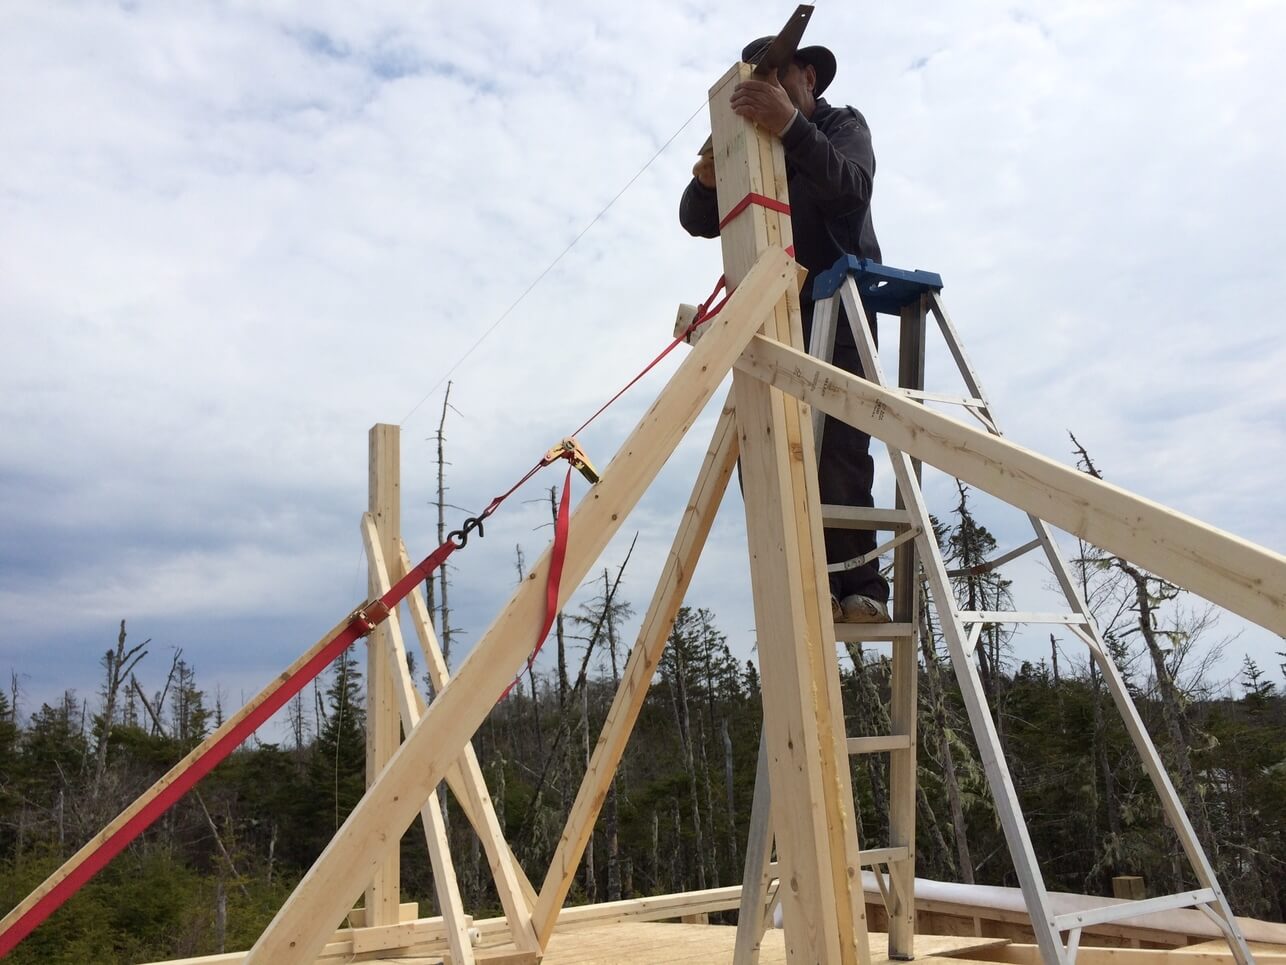
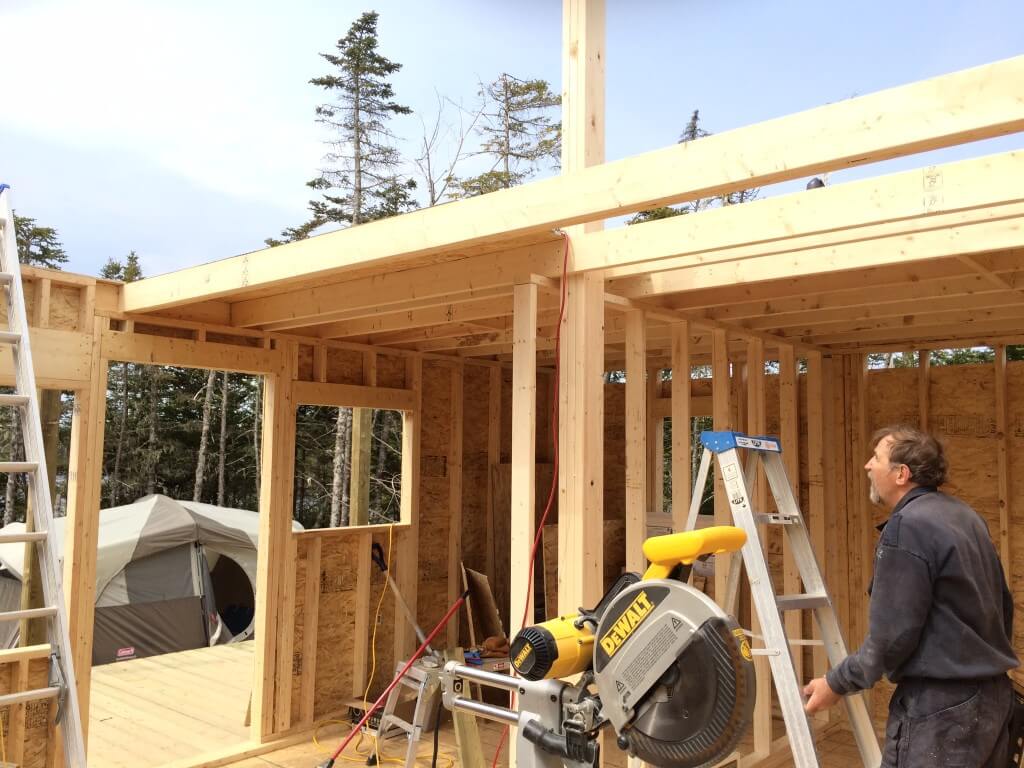
The Ridge Beam
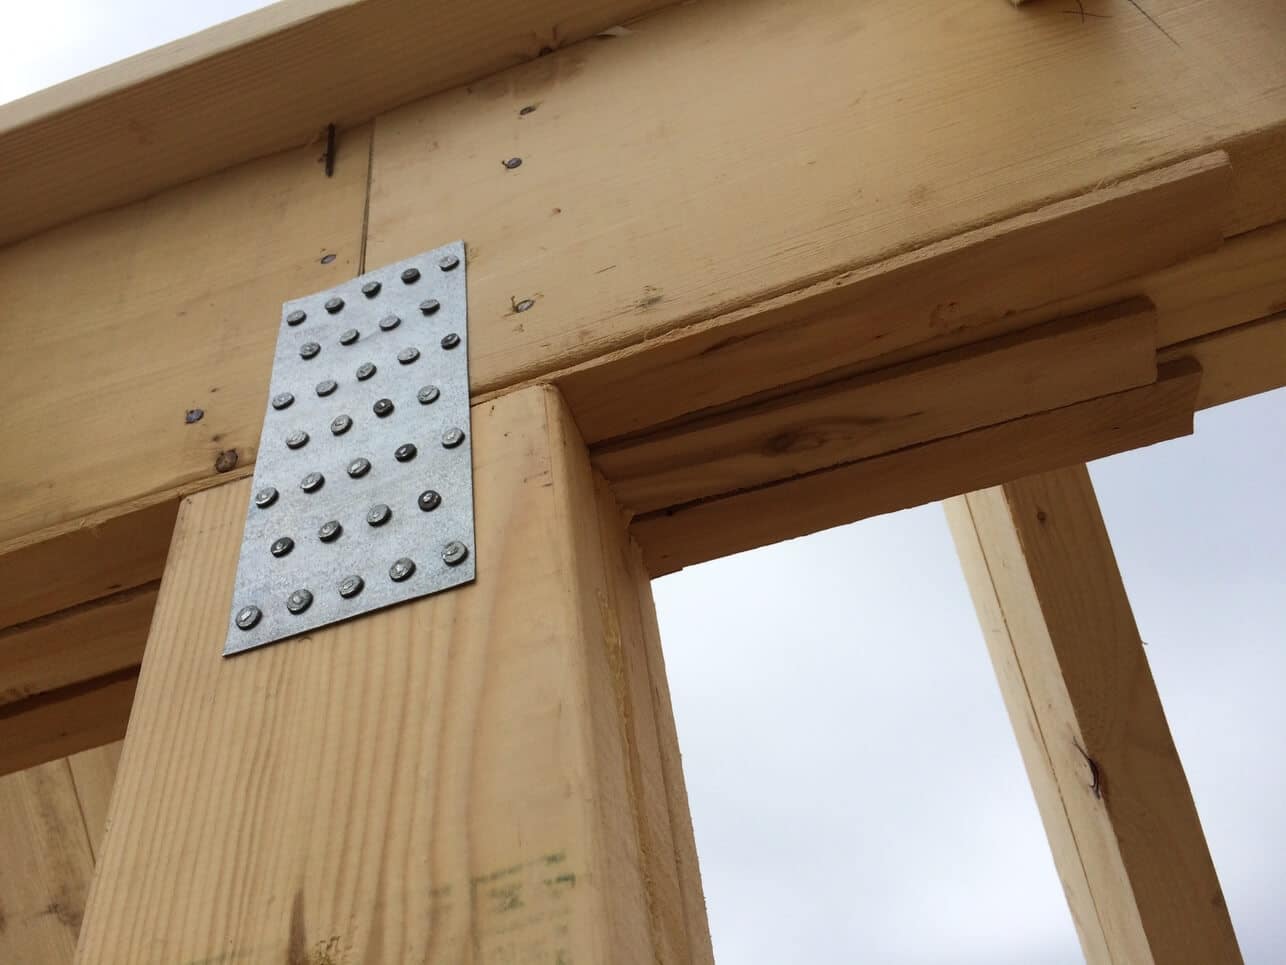
Prior to lifting the first 10 foot 2×10 into place we nailed on 6 Simpson strong tie plates (two on each post) to keep the 2x10s in place. Once we had two 2x10s in place and butted up together we placed a third 10 foot long 2×10 on the center post and glued it with DAP construction adhesive and nailed it to the first tw0 10 foot 2x10s with our irreplaceable DeWalt Cordless nail gun. We then cut a 10 foot 2×10 in half and used those two pieces at either end to complete a second row of 2x10s.

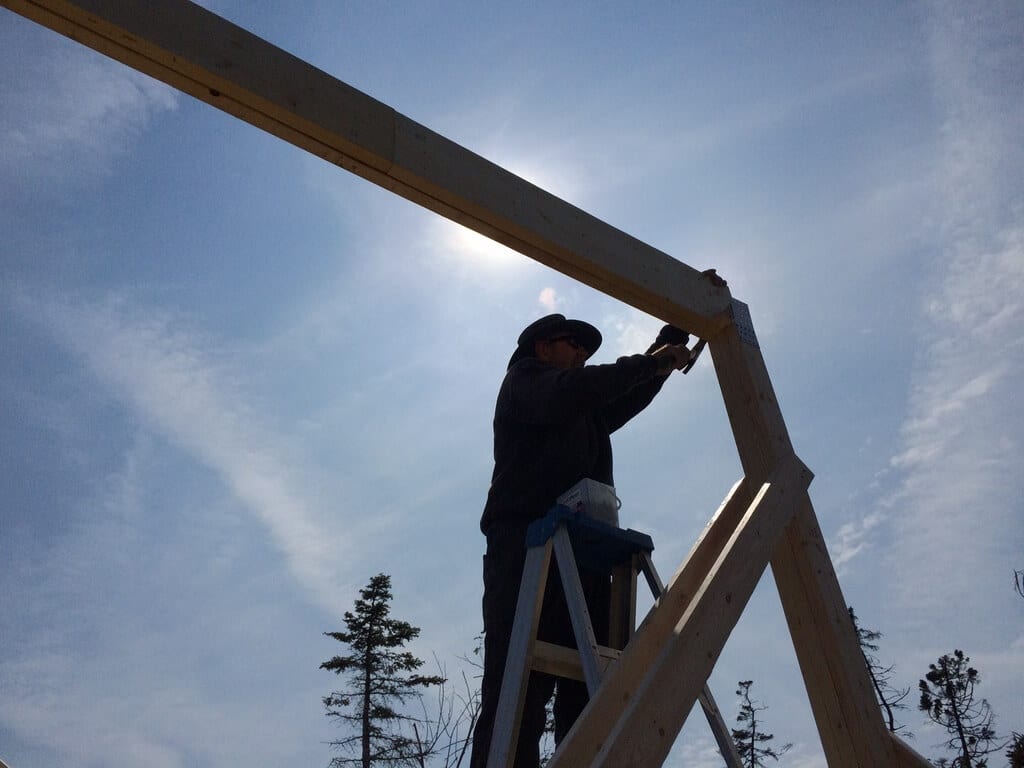
Finally we used two more full length 10 foot 2x10s to complete the three 2×10 wide beam.
Below the last two full length 2x10s are in place, glued and nailed to complete the 20 foot long 2×10 ridge beam.
Below we have the ridge beam complete but not yet nailed into place. Hence why it’s shifted off to the right slightly.
TIP: We use the ratchet straps to ensure each post is plumb and then we’ll secure the beam in place by nailing through the top half of the Simpson strong tie plate and into the ridge beam.
Prior to nailing in the center of the ridge beam we shimmed it to ensure it was perfectly level and properly supported.
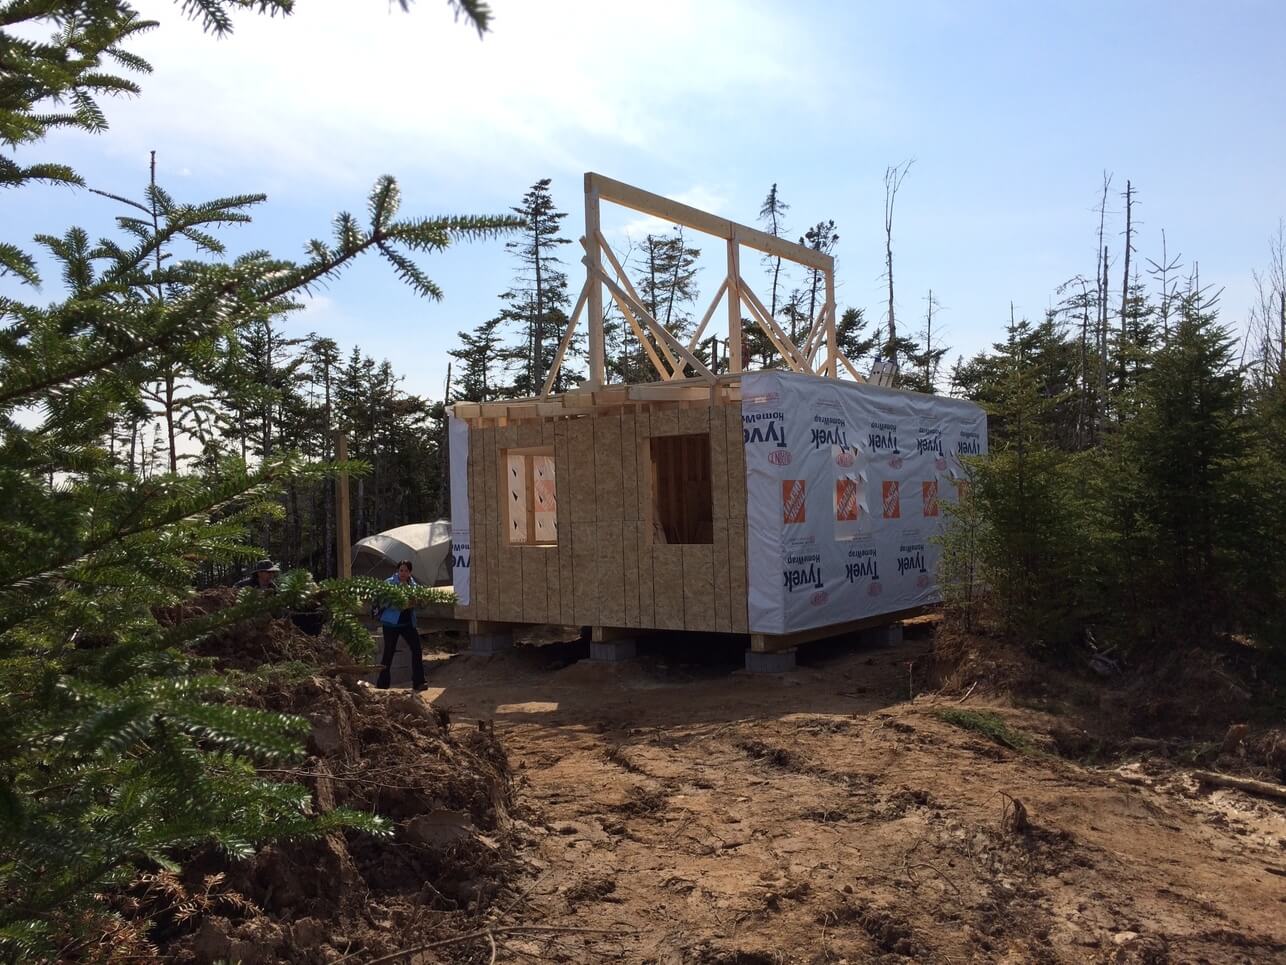
The completed Ridge beam!

Conclusion
The ridge beam is a critical component of your roof system. Often times it’s the heaviest piece of the entire build. It needs to be built to handle the heavy dead and live loads experienced by the roof. We’ve shown you our simple and effective method for building the beam in place and in easy to manage sections. This not only provides a safer work environment but it also guarantees the ridge beam will remain securely in place and stay rock solid for years to come.
Tomorrow is day #10 of the overall build and we’ll begin installing the main cabin rafters.
Your Turn…
How was that? Do you feel ready to tackle the ridge beam? Let us know in the comment section at the bottom!
And hey, did you find this post interesting or informative? If so we’d love for you to share it with others you think would enjoy it.
Cheers!
For all our Pinterest Pinners out there we made you a special pin just for you.


how to clean solar panels
How to Clean Solar Panels: A Step-by-Step DIY Guide As you already know, residential and off-grid solar systems are amazing sources of renewable energy that are quickly growing in popularity. The large flat [...]

earthship
What Is an Earthship and How It Can Help Save the Planet Imagine living in a home that is completely self-sufficient, eco-friendly, and comfortable. A home that grows its own food, collects its [...]

3-way-switch-wiring
3-Way Switch Wiring: A How to Comprehensive Guide Here at the off grid cabin we’ve done our fair share of electrical work including 3-way switch wiring. We’ve done all the internal and external [...]
solar generator
How To Find The Best Solar Generator Impact-Site-Verification: c336f89e-c692-4afd-99d9-0150f7329466 When we first cleared the land to build our off grid home back in 2016, we started with one of those small 700 watt [...]

Off Grid Heating
The Best Off Grid Heating Methods Introduction To Off Grid Heating If you're Living off the grid already or planning to in the future, you already know how important it is to have [...]

off grid appliances
The Best Off Grid Appliances for Off Grid Living Introduction To Off Grid Appliances Living off the grid can be a rewarding and fulfilling experience, but it also comes with some challenges. One [...]


I’m trying to understand the construction of the ridge beam, and the 3 main girders. For the ridge, the description says you used 2x10s that are 8 feet long. You have 3 tripped posts to set the beam on. How does 2 2x10s at 8 feet long span the width of your building of 24 feet? “Once 2 2x10s are up on the posts and butted together, a third is placed on the middle and glued and nailed”. I just don’t get it. And on the girders, I don’t see how to build them on 3 piers without having a break not be on the pier. Can you help me here? Very excited to have found your site. Eating the information for a spring move to Alaska.
Hey Todd!
Glad to have you eating up the info before your BIG move up North.
Yeah, my bad. I see I had written 8 foot length when it should have read 10 foot length. Good catch on you sir!
We used two full length 10 foot 2x10s with the ends butted up together and resting on top of the center post. We secured the 10 foot long 2x10s together using a galvanized Simpson plate. Once those two 2x10s were in place we then cut a 10 foot 2×10 in half and used those two pieces AND a full length 10 foot 2×10 to make up the second row of the ridge beam. Finally we used two more full length 10 foot 2x10s to complete the three 2×10 wide beam. While attached each additional 2×10 using DAP adhesive as well as nails and shims to ensure a level beam.
Hope this clears up any questions you had. I’ve also changed the lengths of the 2×10 beams to state that they are indeed 10 foot lengths!
Thanks for the find and do feel free to let me know anytime you see any discrepancies.
Much appreciated Todd.
Steve
Thanks for the reply and correction. Enjoying your project very much
Why not use a 4×10?
Hey Buddie,
You certainly could use 4×10. For us it came down to what would suitably support the build without additional weight/work/cost.
Steve, does the outer OSB sheeting go right up to be flush with the top sill?
No. If you look through the following posts you will see exactly how we did it.